Note: The Pricing and Block Item action menus have several actions you can use to set up the item's pricing and status in the worksheet.
To set up a new discount %
- Click the
 icon, enter Lifecycle Worksheets, and select the relevant link.
 - Click the Name of an existing Lifecycle Planning Worksheet, or click the Lifecycle Planning Worksheet action to open the selected worksheet.
- Select the desired item or item group in the list or tree, and enter a discount percentage value in the New Discount % column. Multiple lines can have different percentage value. When in Tree view, if the value is entered in the item group, the value will be inherited to all the child lines (items) and you may further adjust the discount percentage value of each child line (item).
- Click Pricing - Add Items to Discount to open the Periodic Discount List page containing all discount offers.
- Select an offer, and click OK. This results in new discount lines being generated in the selected offer for each item.
Note: The offer needs to be disabled for you to be able to add an item to it.
When entering the New Discount %, you can evaluate the total value of the new discounts by observing the Discount Value field in the Discount & Markdown Factbox.
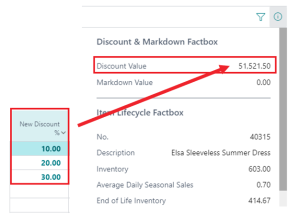
The Discount Value represents the New Discount value multiplied by the Current Price and available Inventory summed over all the items in the worksheet. That is the sum of:
( New Discount % / 100 ) * Current Price * Inventory
After executing the Add Items to Discount action, the New Discount % fields and the Discount Value in the FactBox are set to zero. The Pricing - Periodic Discount List displays all offers. That is Discount, Multibuy, and Mix and Match offers. Here you can manually add items to selected offers.
To set up new prices
- Click the icon, enter Lifecycle Worksheets, and select the relevant link.
- Click the Name of an existing Lifecycle Planning Worksheet, or click the Lifecycle Planning Worksheet action to open the selected worksheet.
- Select the desired item or item group, and enter a value in the New Price column. Multiple lines can have different price value. When in Tree view, if the value is entered in the item group, the value will be inherited to all the child lines (items) and you may further adjust the price value of each child line (item).
- Click Pricing - Set New Prices to insert new corresponding entries in the Sales Price Table, and updated values in the current worksheet.
When entering the New Price, you can evaluate the total value of the new prices by observing the Markdown Value field in the Discount & Markdown Factbox.
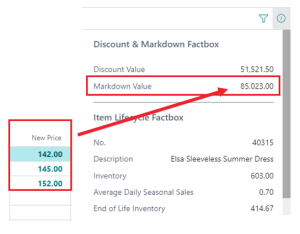
The Markdown Value is the change in price multiplied by the available inventory summed over all the items in the worksheet. That is the sum of:
( Current Price – New Price ) * Inventory
After executing the action Set New Prices, the New Price fields and the Markdown Value in the FactBox will be set to zero.
To block an item from purchase
- In the Lifecycle Planning Worksheet, select the desired item and click Block Item - Block Item from Purchase.
This results in an entry in the Item Status Link table that refers to the item, variant, if any, and the store’s location.
See Also
How to: Set Up a Lifecycle Planning Worksheet
How to: Populate the Lifecycle Planning Worksheet